


Labels:
Programming


Turbo C graphics programming
To start with graphics programming, Turbo C is a good choice. Even though DOS has its own limitations, it is having a large number of useful functions and is easy to program. To implement graphics algorithms, To give graphical display of statistics, To view signals from any source, we can use C graphics. Here is a article to start programming with Turbo C. ‘Run and Learn’ is our method. We have used source codes throughout the explanations. Just execute them to understand what is happening.
Turbo C has a good collection of graphics libraries. If you know the basics of C, you can easily learn graphics programming. To start programming, let us write a small program that displays a circle on the screen.
/* simple.c
example 1.0
*/
#include
#include
example 1.0
*/
#include
#include
void main()
{
int gd=DETECT, gm;
{
int gd=DETECT, gm;
initgraph(&gd, &gm, “c:\turboc3\bgi ” );
circle(200,100,150);
circle(200,100,150);
getch();
closegraph();
}
closegraph();
}
To run this program, you need graphics.h header file, graphics.lib library file and Graphics driver (BGI file) in the program folder. These files are part of Turbo C package. In all our programs we used 640×480 VGA monitor. So all the programs are according to that specification. You need to make necessary changes to your programs according to your screen resolution. For VGA monitor, graphics driver used is EGAVGA.BGI.
Here, initgraph() function initializes the graphics mode and clears the screen. We will study the difference between text mode and graphics mode in detail latter.
InitGraph: Initializes the graphics system.
Declaration: void far initgraph(int far *graphdriver, int far *graphmode, char far *pathtodriver);
Remarks: To start the graphics system, you must first call initgraph.
initgraph initializes the graphics system by loading a graphics driver from disk (or validating a registered driver) then putting the system into graphics mode.
initgraph also resets all graphics settings (color, palette, current position, viewport, etc.) to their defaults, then resets graphresult to 0.
Arguments:
Arguments:
*graphdriver: Integer that specifies the graphics driver to be used. You can give graphdriver a value using a constant of the graphics drivers enumeration type.
*graphmode : Integer that specifies the initial graphics mode (unless *graphdriver = DETECT). If *graphdriver = DETECT, initgraph sets *graphmode to the highest resolution available for the detected driver. You can give *graphmode a value using a constant of the graphics_modes enumeration type.
pathtodriver : Specifies the directory path where initgraph looks for graphics drivers (*.BGI) first. If they’re not there, initgraph looks in the current directory. If pathtodriver is null, the driver files must be in the current directory. This is also the path settextstyle searches for the stroked character font files (*.CHR).
closegraph() function switches back the screen from graphcs mode to text mode. It clears the screen also. A graphics program should have a closegraph function at the end of graphics. Otherwise DOS screen will not go to text mode after running the program. Here, closegraph() is called after getch() since screen should not clear until user hits a key.
If you have the BGI file in the same folder of your program, you can just leave it as “” only. you need not mention *graphmode if you give *graphdriver as DETECT.
In graphics mode, all the screen co-ordinates are mentioned in terms of pixels. Number of pixels in the screen decides resolution of the screen. In the example 1.0, circle is drawn with x-coordinate of the center 200, y-coordinate 100 and radius 150 pixels. All the coordinates are mentioned with respect to top-left corner of the screen.
Basic Shapes and Colors:
Now let us write a program to draw some basic shapes.
/*
shapes.c
example 1.1
*/
shapes.c
example 1.1
*/
#include
#include
#include
void main()
{
int gd=DETECT, gm;
int poly[12]={350,450, 350,410, 430,400, 350,350, 300,430, 350,450 };
initgraph(&gd, &gm, “”);
{
int gd=DETECT, gm;
int poly[12]={350,450, 350,410, 430,400, 350,350, 300,430, 350,450 };
initgraph(&gd, &gm, “”);
circle(100,100,50);
outtextxy(75,170, “Circle”);
rectangle(200,50,350,150);
outtextxy(240, 170, “Rectangle”);
ellipse(500, 100,0,360, 100,50);
outtextxy(480, 170, “Ellipse”);
line(100,250,540,250);
outtextxy(300,260,”Line”);
outtextxy(75,170, “Circle”);
rectangle(200,50,350,150);
outtextxy(240, 170, “Rectangle”);
ellipse(500, 100,0,360, 100,50);
outtextxy(480, 170, “Ellipse”);
line(100,250,540,250);
outtextxy(300,260,”Line”);
sector(150, 400, 30, 300, 100,50);
outtextxy(120, 460, “Sector”);
drawpoly(6, poly);
outtextxy(340, 460, “Polygon”);
getch();
closegraph();
}
outtextxy(120, 460, “Sector”);
drawpoly(6, poly);
outtextxy(340, 460, “Polygon”);
getch();
closegraph();
}
Here is the screenshot of output:
Output of above program
Here, circle() function takes x, y coordinates of the circle with respect to left top of the screen and radius of the circle in terms of pixels as arguments. Not that, in graphics, almost all the screen parameters are measured in terms of pixels.
Function outtextxy() displays a string in graphical mode. You can use different fonts, text sizes, alignments, colors and directions of the text that we will study later. Parameters passed are x and y coordinates of the position on the screen where text is to be displayed. There is another function outtext() that displays a text in the current position. Current position is the place where last drawing is ended. These functions are declared as follows:
void far outtextxy(int x, int y, char *text);
void far outtext(char *text);
void far outtext(char *text);
Circle, arc, pieslice are declared as follows:
Declaration:
* void far arc(int x, int y, int stangle, int endangle, int radius);
* void far circle(int x, int y, int radius);
* void far pieslice(int x, int y, int stangle, int endangle, int radius);
* void far circle(int x, int y, int radius);
* void far pieslice(int x, int y, int stangle, int endangle, int radius);
Remarks:
* arc draws a circular arc in the current drawing color.
* circle draws a circle in the current drawing color.
* pieslice draws a pie slice in the current drawing color, then fills it using
the current fill pattern and fill color.
* circle draws a circle in the current drawing color.
* pieslice draws a pie slice in the current drawing color, then fills it using
the current fill pattern and fill color.
Arguments:
* (x,y): Center point of arc, circlew, or pie slice
* stangle: Start angle in degrees
* endangle: End angle in degrees
* radius: Radius of arc, circle, and pieslice
* stangle: Start angle in degrees
* endangle: End angle in degrees
* radius: Radius of arc, circle, and pieslice
Here, stangle and endangle are in degrees starting from the +ve x-axis in the polar coordinate system in the anti-clockwise direction. if stangle is 0, endangle is 360, it will draw a full circle. Refer this figure for clear idea: For the details of current color, fill color and fill patterns, refer the sections Lines and Colors.
Angle calculations
Another basic shape that we come across is a rectangle. To draw a border, use rectangle with the coordinates of outline, to draw a square use rectangle with same height and width. drawpoly() and fillpoly() are two functions useful to draw any polygons. To use these functions, store coordinates of the shape in an array and pass the address of array as an argument to the function. By looking at the output of the previous program, you can understand what drawpoly is. fillpoly is similar except that it fills in the shape with current fill color.
Declaration:
* void far rectangle(int left, int top, int right, int bottom);
* void far drawpoly(int numpoints, int far *polypoints);
* void far fillpoly(int numpoints, int far *polypoints);
* void far drawpoly(int numpoints, int far *polypoints);
* void far fillpoly(int numpoints, int far *polypoints);
Remarks:
* Rectangle draws a rectangle in the current line style, thickness, and drawing color.
* Drawpoly draws a polygon using the current line style and color.
* Fillpoly draws the outline of a polygon using the current line style and color, then fills the polygon using the current fill pattern and fill color.
* Drawpoly draws a polygon using the current line style and color.
* Fillpoly draws the outline of a polygon using the current line style and color, then fills the polygon using the current fill pattern and fill color.
Arguments:
* (left,top) is the upper left corner of the rectangle, and (right,bottom) is its lower right corner.
* numpoints: Specifies number of points
* Polypoints: Points to a sequence of (numpoints x 2) integers. Each pair of integers gives the x and y coordinates of a point on the polygon.
* numpoints: Specifies number of points
* Polypoints: Points to a sequence of (numpoints x 2) integers. Each pair of integers gives the x and y coordinates of a point on the polygon.
To draw a closed polygon with N points, numpoints should be N+1 and the array polypoints[] should contain 2(N+1) integers with first 2 integers equal to last 2 integers.
Let us study more about shapes latter. Here is some idea about colors. There are 16 colors declared in graphics.h as listed bellow.
BLACK : 0
BLUE : 1
GREEN : 2
CYAN : 3
RED : 4
MAGENTA : 5
BROWN : 6
LIGHTGRAY : 7
DARKGRAY : 8
LIGHTBLUE : 9
LIGHTGREEN : 10
LIGHTCYAN : 11
LIGHTRED : 12
LIGHTMAGENTA : 13
YELLOW : 14
WHITE : 15
BLUE : 1
GREEN : 2
CYAN : 3
RED : 4
MAGENTA : 5
BROWN : 6
LIGHTGRAY : 7
DARKGRAY : 8
LIGHTBLUE : 9
LIGHTGREEN : 10
LIGHTCYAN : 11
LIGHTRED : 12
LIGHTMAGENTA : 13
YELLOW : 14
WHITE : 15
To use these colors, use functions setcolor(), setbkcolor() and setfillstyle(). setcolor() function sets the current drawing color. If we use setcolor(RED); and draw any shape, line or text after that, the drawing will be in red color. You can either use color as defined above or number like setcolor(4);. setbkcolor() sets background color for drawing. Setfillstyle sets fill pattern and fill colors. After calling setfillstyle, if we use functions like floodfill, fillpoly, bar etc, shpes will be filled with fill color and pattern set using setfillstyle. These
function declarations are as follows.
Declaration:
Declaration:
* void far setfillstyle(int pattern, int color);
* void far setcolor(int color);
* void far setbkcolor(int color);
* void far setcolor(int color);
* void far setbkcolor(int color);
Remarks:
* setfillstyle sets the current fill pattern and fill color.
* setcolor sets the current drawing color to color, which can range from 0 to getmaxcolor.
* setbkcolor sets the background to the color specified by color.
* setcolor sets the current drawing color to color, which can range from 0 to getmaxcolor.
* setbkcolor sets the background to the color specified by color.
The parameter pattern in setfillstyle is as follows:
Parameter pattern in setfillstyle
Here is an example program with colors, pixels, bar, cleardevice etc. stdlib.h is used for random number generation. We have a function random(no), it returns a random number between 0 an no. The effect is by drawing random radius, random color circles with same center and random pixels. kbhit() function(defined in conio.h) returns a nonzero value when a key is pressed in the keyboard. So, the loop will continue until a key is pressed.
/*
random.c
some graphics effects using random numbers.
example 1.2
by HarshaPerla, http://eharsha.tk
*/
random.c
some graphics effects using random numbers.
example 1.2
by HarshaPerla, http://eharsha.tk
*/
#include “graphics.h”
#include “conio.h”
#include “stdlib.h”
#include “conio.h”
#include “stdlib.h”
void main()
{
int gd,gm;
gd=DETECT;
{
int gd,gm;
gd=DETECT;
initgraph(&gd, &gm, “”);
setcolor(3);
setfillstyle(SOLID_FILL,RED);
bar(50, 50, 590, 430);
setcolor(3);
setfillstyle(SOLID_FILL,RED);
bar(50, 50, 590, 430);
setfillstyle(1, 14);
bar(100, 100, 540, 380);
bar(100, 100, 540, 380);
while(!kbhit())
{
putpixel(random(439)+101, random(279)+101,random(16));
setcolor(random(16));
circle(320,240,random(100));
}
getch();
closegraph();
}
{
putpixel(random(439)+101, random(279)+101,random(16));
setcolor(random(16));
circle(320,240,random(100));
}
getch();
closegraph();
}
Labels:
Programming
How to install Turbo C++ on Windows 7 64bit
I am providing step-by-step procedure how to install Turbo C++ on 64 bit Windows 7.
| 1. Install the software DOSBox ver 0.73 : download here |
| 2. Create a folder,for example „Turbo“ (c:\Turbo\) |
| 3. Download and extract TC into the Turbo folder (c:\Turbo\): download here |
| 4. Run the DOSBox 0.73 from the icon located on the desktop: |
 |
| 5. Type the following commands at the command prompt [Z]: mount d c:\Turbo\ [The folder TC is present inside the folder Turbo] |
| Now you should get a message which says: Drive D is mounted as a local directory c:\Turbo\ |
 |
| 6. Type d: to shift to d: |
 |
| 7. Next follow the commands below: cd tc cd bin tc or tc.exe [This starts you the Turbo C++ 3.0] |
 |
| 8. In the Turbo C++ goto Options>Directories> Change the source of TC to the source directory [D] ( i.e. virtual D: refers to original c:\Turbo\ . So make the path change to something like D:\TC\include and D:\TC\lib respectively ) |
How to start TurboC++ in the DOSBox automatically:You can save yourself some time by having DOSBox automatically mount your folders and start TurboC++: |
| For DOSBox versions older then 0.73 browse into program installation folder and open the dosbox.conf file in any text editor. For version 0.73 go to Start Menu and click on “Configuration” and then “Edit Configuration“. Then scroll down to the very end, and add the lines which you want to automatically execute when DOSBox starts. |
| Automatically mount and start Turbo C++3.0 in DOSBox ver 0.73: |
 |
| Scroll down to the very end, and add the lines: |
 |
| Those commands will be executed automatically when DOSBox starts! |
| Please note: Full screen: Alt and Enter When you exit from the DosBox [precisely when u unmount the virtual drive where Turbo C++ 3.0 has been mounted] all the files you have saved or made changes in Turbo C++ 3.0 will be copied into the source directory(The directory which contains TC folder) Don’t use shortcut keys to perform operations in TC because they might be a shortcut key for DOSBOX also . Eg : Ctrl+F9 will exit DOSBOX rather running the code . VIDEO tutorial (there is another setup – original path to Turbo C++ is h:\tc\ and drive H is mounted as drive C:) |
Labels:
Mobiles

First Windows 8 smartphone scheduled for January release
While Windows 8 still seems to be a long way from official release, reports of upcoming devices supporting it are becoming more common – such as the Dell Latitude ST tablet. Now, a Chinese company, In Technology Group, has announced it is developing a Windows 7 smartphone that will support Windows 8 when it is released, just like the Windows 7-at-launch Dell tablet.
ITG has in the past launched two Windows phones, one that ran XP, and another, the XPPhone, that ran Windows 7. The upcoming Windows 8-ready device will be called XPPhone 2, and will be the company’s slimmest, lightest, and most energy efficient such device. ITG is calling the “smallest notebook PC in the world.”
The XPPhone 2 will feature some pretty solid hardware with a 4.3-inch display, a 1.6GHz Intel Atom Z530 processor, 2GB of RAM, and 112GB of SSD storage space. ITG also mentioned it is considering a 2GHz offering as well. Other specs revealed include an 18 hour talk time, and 46 day standby time. The XPPhone 2 measures in at 140 x 73 x 17.5mm, and will apparently have a docking system to provide a keyboard for laptop-like form factors
Labels:
Mobiles

If reports are to be believed, Samsung's flexible phones will also feature an interactive screen, very much like the one showed off by Nokia. While Asha and Windows Phones headlined the Nokia World 2011 event, Nokia's concept 'kinetic device' also managed to grab the eyeballs. As previously reported, Nokia's bendable phone features a flexible OLED display, which can be bent from the middle and edges.Earlier this year, Samsung had taken over a Dutch company Liquavista, which develops electrowetting displays. These displays are not only known for their low-cost but also for high brightness, flexibility and transperancy. Samsung has already showcased its flexible and transparent displays at the CES 2011. The 4.5-inch flexible and 19-inch transparent AMOLEDs had then received extensive media coverage.
Samsung to launch phones with flexible displays next year
Remember Nokia's flexible phone prototype showcased at the Nokia World 2011 event? Well, we don't know when Nokia is going to materialise its 'concept kinetic device' but what we know is that Samsung will start selling bendable phones from next year!
"The flexible display, we are looking to introduce sometime in 2012, hopefully the earlier part than later," says Samsung spokesperson Robert Yi on its earnings conference call. "The application probably will start from the handset side and then migrate over to tablets and other mobile devices." The spokesperson declined to divulge more details.
If reports are to be believed, Samsung's flexible phones will also feature an interactive screen, very much like the one showed off by Nokia. While Asha and Windows Phones headlined the Nokia World 2011 event, Nokia's concept 'kinetic device' also managed to grab the eyeballs. As previously reported, Nokia's bendable phone features a flexible OLED display, which can be bent from the middle and edges.Earlier this year, Samsung had taken over a Dutch company Liquavista, which develops electrowetting displays. These displays are not only known for their low-cost but also for high brightness, flexibility and transperancy. Samsung has already showcased its flexible and transparent displays at the CES 2011. The 4.5-inch flexible and 19-inch transparent AMOLEDs had then received extensive media coverage.
Samsung's foray into the flexible display segment has not surprised the industry much as the company seems to be riding high on the success of its devices, especially the Galaxy S II. The company also recently surpassed Apple in global smartphone sales in the third quarter of 2012.
Labels:
Windows

Supposedly Leaked Roadmap Reveals Windows 8,Windows 9 and Windows Phone Apollo Roadmap
With the release of Windows 8 Developer Preview the expectancies from the latest version of Windows have increased significantly,and now to increase curiosity, reports of a leaked Microsoft road map are doing rounds on the web revealing an August 2012 commercial launch schedule for Windows 8. Prior to that, the beta will reportedly arrive during CES 2012 this coming January along with the WinStore Beta, an online marketcommunity technology preview (CTP), and the first “Tango” update for Windows Phone. Windows 9 is even slated for a late 2014 reveal.
According to the roadmap, the Release Candidate for Windows 8 (RC) will roll out at MIX 2012 along with the online market beta and the Kinect commercial SDK — “Apollo” for Windows Phone is also expected to be revealed. By the time E3 2012 rolls around, Microsoft will reportedly unveil the Xbox 360 SDK for creating apps, the Apollo SDK for Windows Phone and third-generation Kinect games. The Windows 8 RTM build is also expected to be released in June 2012.
Later,In August 2012 , Windows 8, The Online Market, Windows Phone 8 and the Xbox (App) Store will launch if all goes according to plan. Then in September during BUILD 2012 Microsoft will offer a Windows 8 product upgrade developer preview
On the Windows 9 front, a developer preview is expected to go live during BUILD 2013 followed by a Beta during CES 2014. A Release Candidate is slated to arrive during MIX 2014 followed by the RTM build with Internet Explorer 12 during BUILD 2014. It also looks like Windows 9 Mobile will also make its debut, as both the desktop and mobile versions will go commercial in November 2014.
Labels:
Programming
In this C Sharp tutorial you will learn user interface designin C# application. This step-by-step tutorial will help you deeply understand the basic building concept of user interface design in C# application. You will learn to use different types of GUI controls in C# Windows form-based application.
User Interface Design in C# Windows Form Application From Scratch
In this C Sharp tutorial you will learn user interface designin C# application. This step-by-step tutorial will help you deeply understand the basic building concept of user interface design in C# application. You will learn to use different types of GUI controls in C# Windows form-based application.
You must be familiar with the basic syntax of C# language. Here are the steps. I have also uploaded the screenshots for your better understanding.
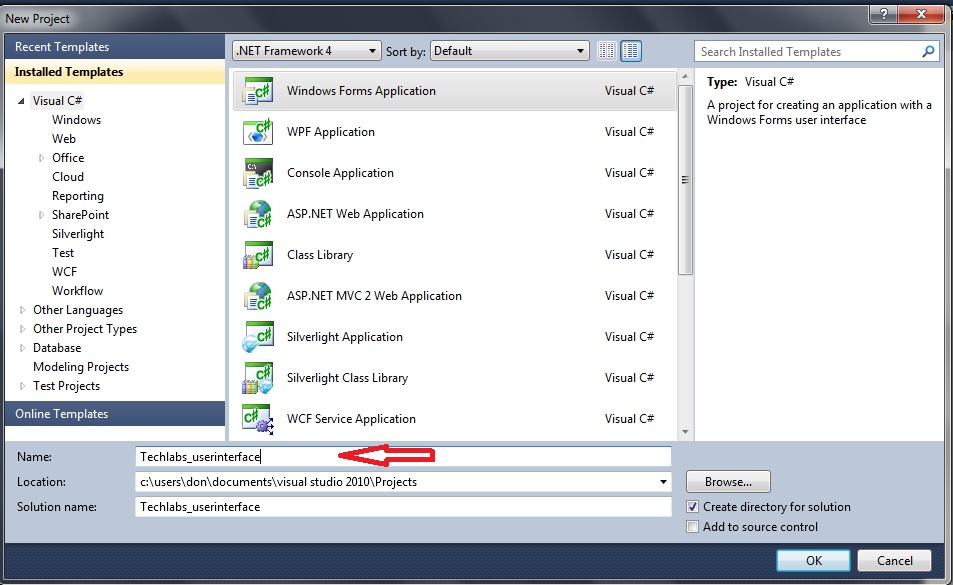
Open Visual Studio 2010. Click on New Project. Choose the project category “C# Windows Form Application”. At the bottom you can rename your application. As you can see I have renamed it to “techlab_userinterface”. Then click Ok.
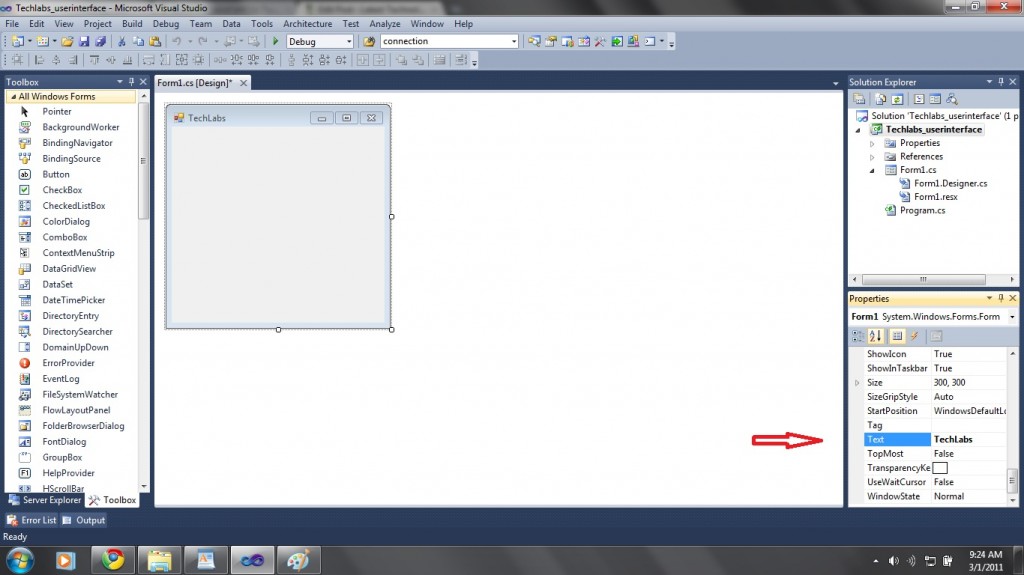
After clicking Ok, you will see a blank form. First of all if you want to change your Form Name, go to the properties window and Find “Text“. Change it to what ever you want. I changed it to “TechLabs“. On Left Side you will see the Toolbars windows. Today we will learn to use some of these basic controls. If you are not viewing these toolbars then you can enable them from View->Toolbox.
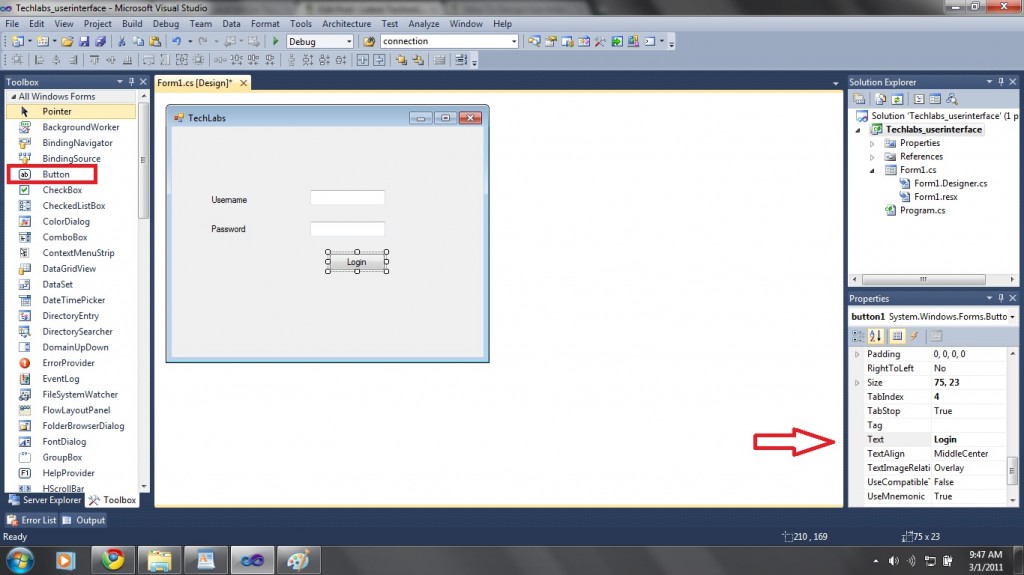
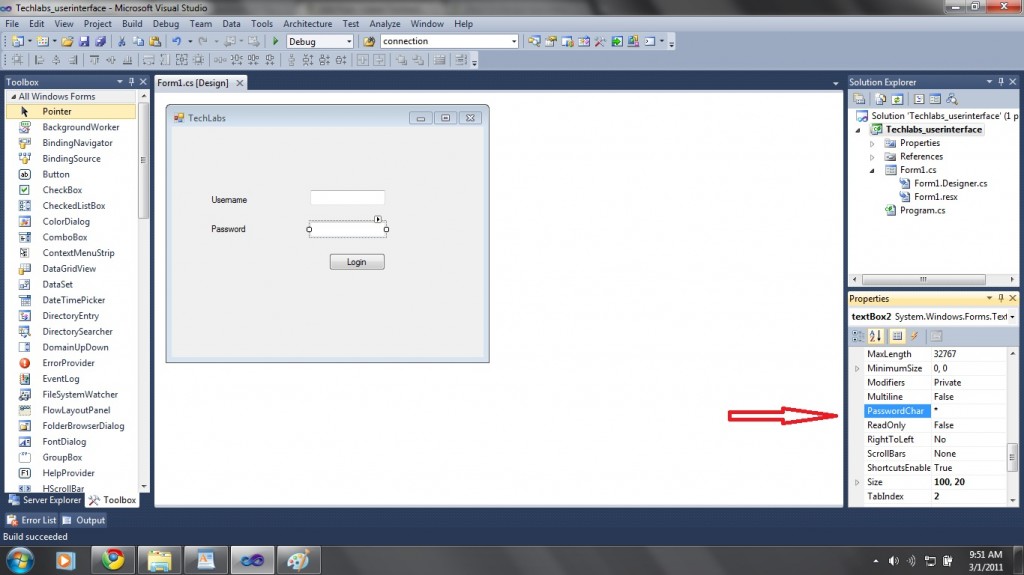
Now we will start dragging Controls from the toolbox window. I have dragged two text boxes, two labels and one button. Rename all of these by simply selecting control on form and changing Text in the properties window as shown in this screenshot.
Now we are designing a Login Form. We all know that when ever we type our password to some Login window then it appears as dots. We will also add this option to our lower text box. Here we go. Simply select the lower text box. Then go to the properties window and Find “Password Char”. Fill it with the desired character. I filled it with “*”. Now when you will enter password, stars will appear.
Now let’s start the core of the process. Double click the Login button. Here we will write some piece of code. For example I want to authenticate a user on entering:
Username= techlabs
Password= techlabsrox
Then I will write the following code.
In the above code, in first line I am comparing it with the username and password. If it is correct a pop up will appear that you have entered the correct details. Otherwise you will see an error message and both text boxes will be clear.
Subscribe to:
Posts (Atom)


